CodonCode Aligner can help you to find, verify, and analyze heterozygous and homozygous mutations in sequencing reactions generated from genomic PCR. This page describes how to find point mutations. How to find and analyze heterozygous insertions and deletions ("indels") is described a bit later in this tour.
First, open the "PolyPhred_example" project (it is in the "Examples" folder in the "CodonCode Aligner" folder). When Aligner is done reading the project, you will see a project view with two contigs.
Finding heterozygous point mutations (we'll just call it "SNP detection" from now on) is always done using contigs in Aligner. This allows Aligner to compare peaks between aligned traces, and improves detection accuracy a lot when compared to just looking at individual samples. How the contigs were created does not matter - they can be generated by assembly with CodonCode Aligner, alignment to a reference sequence, or by importing assemblies.
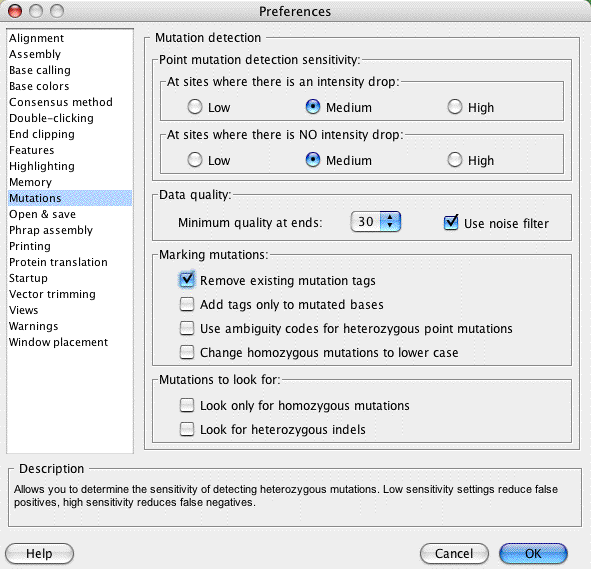
Before we start finding SNPs and looking at result, let us first make sure the preferences are exactly like we want them to be. Select the "Preferences..." menu item (in the "Edit" menu on windows, and in the "CodonCode Aligner" menu on OS X). When the preferences dialog opens, click on "Mutations" on the left side, and make sure your selections are exactly as shown below:
After making any necessary changes, click the "OK" button.
For this section, we use the "PolyPhred_example" project that you can find inside the "Example Files" folder in the "CodonCode Aligner" folder. Go ahead and open the project.
Next, go to the project view and click on "Contig1" to select it. Then, go to the "Contig" menu, and choose "Find mutations". You will see a progress bar, and after a few seconds, Aligner will open a new feature view that shows the mutations tags it just identified:

You should also be able to see a summary of the results in the status bar at the bottom of the project view. It should say "Analyzed 1626 bases; found 16 mutated bases at 9 positions in 1 contig". Notice that this summary also has been added as a "mutationSummary" tag to the contig "Contig1", and is shown at the top of the mutation result table.
Look at the mutation tags window (you may need to resize first). In the left column, you see the characterization of the bases at each consensus base where Aligner found a mutation. The "Found In" column tells you the sample the mutation was in, or lists "Contig1" for the "polymorphism" tags that Aligner added to the consensus sequence. The content column gives additional information about the mutation, or (for consensus tags) about the mutations found at this position. We'll look at the content column more closely in the next section.
Try clicking on the headers in the table (for example on "Content") to sort by that column. Click again on the same column to switch the sort order from ascending to descending.
Double-click on the highlighted line in the "Mutation tags" window. This will bring up the contig view, and position it to this base:
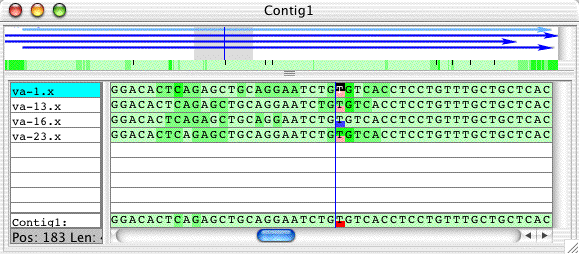
The pink boxes indicate heterozygous bases, the blue boxes homozygous bases. Also note the little black bars in the green quality panel (between the arrows at the top and the aligned bases below) - they indicate the positions of mutation tags in the contig.
You can check Aligner's characterizations by looking at the traces - just double-click on the consensus base to bring up several traces here:

This is a clean example of three heterozygous bases that show a strong secondary peak and a reduction in peak intensity (for the red T peaks).
Next, we will take a closer look at the tags here, and learn how to change classifications made by Aligner.
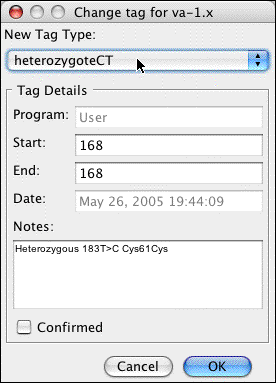
Right-click (OS X users: control-click) on the 'T' with the heterozygous tag to bring up the popup menu. The first item in the popup menu should read "Show tag: HeterozygoteCT..." (you can also select the base by clicking on it, then go to the "Sample" menu, select the "Tag" submenu, then "Show tag: HeterozygoteCT...").
Selecting "Show tag: HeterozygoteCT..." from the popup menu or the menu will bring up the tag dialog:

Let us pretend that we disagree with Aligner's classification, and instead think that this base is a homozygous A. We can change the tag by clickin on the "Change..." button on the left side to bring up another dialog:
In the pulldown menu at the top, select "homozygoteAA". Your dialog should now look like this:
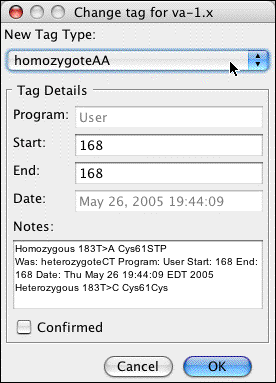
Note that the description of the mutation has changed; a homozygous A at this position would change a Cystein to a stop codon. Also note that the "Notes" section now contains a description of the original tag, and when it was changed.
Ok, this was just for illustration, we do not really want to make this change. Press "Cancel" in both dialogs, and go back to the trace view.
When finding all mutated bases is important to you, you probably should change the mutation detection sensitivity from "Medium" to "High", and also uncheck the "Use noise filter" chackbox. At high sensitivity, however, Aligner will mis-classify more non-mutated bases. To make it easier to classify false positives, Aligner provides a shortcut in the popup menu. Go to trace view, and right-click (OS X: control-click) on the base with the heterozygoteCT tag to bring up the popup menu. The second item should say "Mark heterozygoteCT as False Positive" (if it does not, you may have clicked on the wrong base - or you need to update to a newer version of CodonCode Aligner).
Select "Mark heterozygoteCT as False Positive" from the popup menu, and go back to the mutation table. You'll notice that the tag type and content for this base has changed.
Well, we called this one false positive for illustration purposes only, so go to the "Edit" menu and choose "Undo Change Tag" to undo the change.
One more thing you can do with mutation tags is to mark them as confirmed. Bring the tag dialog for the base we were looking at back up, as described above. Then, click on the "Confirmed" checkbox:

Click "OK". Now look at the "Mutation tags" window - you'll notice that the "Confirmed" is shown in the "Content" column.
Before going on to the next section, here are a few things you can try:
You will probably not always agree with Aligner's classification, especially if you change the preferences to more sensitive settings, which causes Aligner to classify more random peaks as heterozygotes. When analyzing your own data, it is important that you adjust the detection sensitivity to your own needs, and that you check the results.
The next sections show how to use fine-tune mutation detection by using a reference sequence, defining the coding region, and excluding regions from the analysis.
Aligner Home Page - Quick Tour Start - Previous - Next: Defining the Coding Region